
Crispy Garlic Bread Chicken Melts: A Delicious Twist on Comfort Food
There’s something magical about the way certain recipes can transport us back to cherished moments. For me, one such dish is the humble yet irresistible garlic bread. Growing up, my family often gathered around the dinner table with a warm loaf of garlic bread, its intoxicating aroma filling the air and hearts alike. It was more than just a side dish; it was a symbol of togetherness, comfort, and love shared over meals. Fast forward to today, and I find myself blending that nostalgic flavor with another family favorite—chicken melts. The result? A delightful fusion I like to call Crispy Garlic Bread Chicken Melts.
These gooey, cheesy sandwiches are not only satisfying but also incredibly easy to whip up, making them perfect for a weeknight dinner or a cozy gathering with friends. The combination of crispy garlic bread with savory chicken and melted cheese creates a culinary experience that is both comforting and indulgent. Let’s dive into this delicious recipe and explore the elements that make these melts a true comfort food sensation!
Ingredients That Make It Special
The beauty of Crispy Garlic Bread Chicken Melts lies in their simplicity and flavor. With just a handful of ingredients, you can create a dish that feels gourmet while remaining accessible to home cooks of all skill levels. Here’s what you’ll need to create this delectable dish:
– Cooked Chicken Breasts: Start with two large cooked chicken breasts, shredded. This is a fantastic way to use leftover chicken or rotisserie chicken, providing a hearty base for our melts. The shredded chicken ensures that every bite is packed with flavor and moisture.
– Mozzarella Cheese: One cup of shredded mozzarella cheese is essential for that gooey, melty goodness that oozes out with every bite. Its mild flavor complements the other ingredients perfectly and creates that irresistible cheese pull we all love.
– Parmesan Cheese: Half a cup of grated Parmesan cheese adds a rich, nutty flavor that beautifully complements the chicken. This hard cheese not only enhances the taste but also contributes to a delightful texture.
– Mayonnaise: A quarter cup of mayonnaise brings creaminess to the mixture, helping to bind the ingredients together. It adds richness without overpowering the other flavors, ensuring that each bite remains balanced.
– Garlic: Two cloves of minced garlic infuse the chicken with that beloved garlic flavor we all crave in our comfort foods. Fresh garlic adds depth and a fragrant aroma that makes the entire dish more inviting.
– Dried Italian Herbs: One teaspoon of dried Italian herbs—a mix of basil, oregano, and thyme—adds a burst of aromatic flavor. These herbs are quintessential in Italian cuisine and enhance the overall taste profile of the melts.
– Red Pepper Flakes: Optional but recommended, half a teaspoon of red pepper flakes can be added if you enjoy a little heat in your dish. It’s a simple way to elevate the flavor without making it overwhelmingly spicy.
– Salt and Pepper: To taste, these staples are crucial for enhancing the overall flavor. A pinch of salt and a dash of pepper can make a world of difference in bringing all the ingredients together.
– Italian Bread: Eight thick slices of Italian bread form the base of our melts, providing a crispy exterior and soft interior. The bread acts as a sturdy vessel for all the delicious fillings while toasting beautifully to a golden brown.
Preparing the Filling
With the ingredients set, the first step in creating your Crispy Garlic Bread Chicken Melts is to prepare the filling. Start by shredding your cooked chicken breasts into bite-sized pieces. This not only makes it easier to mix with the other ingredients but also ensures that the chicken integrates well into the melty goodness of the dish.
In a large mixing bowl, combine the shredded chicken with the mozzarella cheese, grated Parmesan cheese, mayonnaise, minced garlic, and dried Italian herbs. If you’re opting for a little heat, now is the time to sprinkle in the red pepper flakes. Season the mixture with salt and pepper to taste. Mix everything together until well combined; you want to ensure that every piece of chicken is coated in the creamy, cheesy goodness.
Once your filling is ready, it’s time to prepare the garlic bread aspect of the melts. Take your Italian bread slices and spread a generous layer of softened butter or olive oil on one side of each slice. This layer will not only add flavor but will also help achieve that delightful crispiness when the melts are baked. For an added punch of flavor, you can mix minced garlic into the butter or oil before spreading it on the bread.
Assembling the Melts
Now that you have the filling and the bread prepared, it’s time to assemble your Crispy Garlic Bread Chicken Melts. Preheat your oven to 375°F (190°C) to ensure that your melts cook evenly and achieve that perfect golden crust.
Begin by laying half of the bread slices, buttered side down, on a baking sheet. Spoon a generous amount of the chicken filling onto each slice, making sure to spread it out evenly. Top with the remaining slices of bread, buttered side up. This creates a lovely sandwich that will crisp up beautifully in the oven.
Before placing the baking sheet in the oven, you might consider sprinkling a little extra Parmesan cheese on top of the sandwiches for an added layer of flavor and an enticing golden finish. The cheese will melt and form a delicious crust that enhances both the taste and presentation of your melts.
After assembling your Crispy Garlic Bread Chicken Melts, place them in the preheated oven. Bake for about 15-20 minutes or until the bread is golden brown and crispy and the cheese is bubbling. The aroma that fills your kitchen during this time will undoubtedly make everyone eager to dig in.
As the melts bake, you’ll have the perfect opportunity to set the table or prepare a simple side salad to accompany your meal. A fresh, light salad can balance out the richness of the melts and add a splash of color to your dining experience.
Stay tuned for the next part, where we will delve into the finishing touches, serving suggestions, and why these Crispy Garlic Bread Chicken Melts are destined to become a favorite in your household.
{{image_2}}
Butter and Garlic Powder
To create the perfect garlic spread that will elevate your Crispy Garlic Bread Chicken Melts, start by preparing the garlic butter. Combine ½ cup of softened unsalted butter with 2 teaspoons of garlic powder in a small bowl. This mixture will be the key to achieving that rich, savory flavor that complements the chicken and cheese beautifully. Ensure that the butter is softened to room temperature for easy mixing. Once smooth, this garlic butter will not only enhance the taste of the bread but also contribute to its golden, crispy texture when baked.
Adding a pinch of salt to the garlic butter mixture will enhance the overall flavor, making your melts even more irresistible. Feel free to adjust the amount of garlic powder according to your preference; if you’re a garlic lover, a little extra won’t hurt!
Fresh Parsley
Next, to add a touch of freshness and vibrant color, chop up 1 tablespoon of fresh parsley. This herb serves a dual purpose: its bright green color enhances the visual appeal of the dish, and its fresh flavor balances the richness of the melted cheese and buttery bread. Sprinkle the parsley on top of your finished melts just before serving for that extra pop of color and flavor.
Preparation Steps to Perfect Melts
Now that we have our delicious ingredients prepped, let’s walk through the preparation steps to ensure we achieve the perfect Crispy Garlic Bread Chicken Melts.
Preheat the Oven
Begin by preheating your oven to 375°F (190°C). This step is crucial for achieving that perfect crispy texture. A properly preheated oven ensures even cooking, allowing the flavors to meld beautifully and the cheese to melt perfectly.
Combine the Chicken Mixture
In a large mixing bowl, combine the following ingredients:
– 2 cups of shredded cooked chicken
– 1 cup of shredded mozzarella cheese
– ½ cup of grated Parmesan cheese
– ½ cup of mayonnaise
– 2 cloves of minced garlic
– 1 teaspoon of dried Italian herbs
– ¼ teaspoon of red pepper flakes (optional for a spicy kick)
– Salt and pepper to taste
Using a spatula or wooden spoon, mix everything until well combined. The result should be a creamy, cheesy mixture that is not only delicious but also incredibly tempting—you might find yourself sneaking a spoonful!
Prepare the Garlic Butter Bread
In a separate bowl, mix the softened butter with the garlic powder and a pinch of salt until smooth. Generously spread this garlic butter on one side of each slice of Italian bread. This step is essential, as it infuses the bread with flavor and ensures a crispy crust when baked.
Assemble the Melts
On a baking sheet, arrange four slices of the garlic-buttered bread with the butter-side down. Spoon a generous portion of the chicken mixture onto each slice, distributing evenly to ensure every bite is packed with flavor. Then, top each melt with the remaining four slices of bread, ensuring the butter-side is facing up.
Bake Them to Perfection
Pop the baking sheet in the preheated oven and bake for about 15-20 minutes. Keep an eye on them; you’re looking for a crispy, golden-brown crust with melted cheese oozing from the sides. The aroma wafting through your kitchen will be hard to resist, and your family will be eagerly anticipating their first bite!
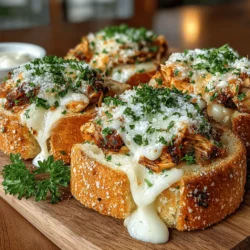
Cut and Garnish
Once baked, carefully remove the melts from the oven and let them cool for a minute. This cooling period is important as it allows the cheese to set slightly, making them easier to cut. Slice each melt in half for easy serving and garnish with the chopped fresh parsley. Serve warm, and prepare for compliments!
Tips & Tricks for Success
Use Leftovers
One of the best things about the Crispy Garlic Bread Chicken Melts is their versatility. If you have leftover chicken or even turkey, feel free to substitute it. The dish is just as delicious and a great way to repurpose leftovers into something new and exciting.
Cheese Variations
While mozzarella and Parmesan are classic choices, don’t hesitate to experiment with other cheeses. Cheddar or fontina can provide a different flavor profile that complements the chicken beautifully. Mixing cheeses can also enhance the creaminess and richness of the dish.
Bread Choices
Although thick slices of Italian bread are ideal, you can get creative with your bread choices. Sourdough or ciabatta can add a unique twist to your melts. Just ensure the bread is thick enough to hold the filling without becoming soggy during baking.
Make It Healthier
If you’re looking to cut down on calories or make the dish healthier, feel free to substitute Greek yogurt for mayonnaise. This swap will still provide creaminess while reducing fat content. Additionally, using whole-grain bread can add extra fiber to your meal.
Serving Suggestions
Crispy Garlic Bread Chicken Melts are exceptionally versatile and can be served in various ways to suit any occasion. Here are some ideas to elevate your dining experience:
– Side Salad: Pair your melts with a refreshing side salad. A simple arugula salad tossed with cherry tomatoes, cucumbers, and a light vinaigrette complements the richness of the melts perfectly.
– Dipping Sauce: Consider serving with a dipping sauce on the side. A marinara sauce or a creamy ranch dressing can enhance the flavors and provide an extra layer of enjoyment.
– Vegetable Side: For a heartier meal, serve with roasted or steamed vegetables, such as broccoli or asparagus. This adds a nutritious component to your dish and balances the richness of the melts.
– Appetizer Version: If you’re hosting a gathering, consider making smaller versions of the melts as appetizers. Use mini slider buns or cut the bread into smaller pieces to create bite-sized delights that are perfect for sharing.
Conclusion
Crispy Garlic Bread Chicken Melts are not just a meal; they are an experience that combines the delightful flavors of garlic, cheese, and tender chicken, all embraced by crispy, buttery bread. This recipe is sure to become a favorite in your household, whether it’s for a quick weeknight dinner or a cozy gathering with friends and family.
With the tips and variations provided, you can easily customize this dish to suit your taste and dietary preferences. Remember to have fun in the kitchen, experiment with different ingredients, and enjoy the process of creating something truly delicious. So, gather your ingredients, preheat your oven, and get ready to enjoy a mouthwatering dish that will impress everyone around your table!