
Campfire Dreams: No-Bake S’mores Cheesecake Jars
When it comes to satisfying a sweet tooth without the hassle of baking, no-bake desserts have taken the culinary world by storm. These treats are not only quick to prepare but also offer an array of flavors and textures that can easily rival their baked counterparts. One such dessert that perfectly encapsulates the essence of summer, nostalgia, and indulgence is the No-Bake S’mores Cheesecake Jar. This delightful treat brings the flavors of the classic campfire s’mores experience into a creamy, portable form that evokes fond memories of summers spent around the fire.
S’mores, a quintessential camping snack made from toasted marshmallows, melted chocolate, and graham crackers, hold a special place in many people’s hearts. The combination of gooey, sweet, and slightly smoky flavors transports us back to our childhood camping trips, where laughter and stories flowed as freely as the chocolate. With the No-Bake S’mores Cheesecake Jars, you can enjoy that same nostalgic experience without the need for a campfire. These jars are perfect for summer gatherings, picnics, or even a cozy night in, offering a deliciously cool way to savor the flavors of s’mores without the heat of the oven.
Understanding the Appeal of No-Bake Desserts
No-bake desserts have surged in popularity for several compelling reasons. Firstly, the convenience they offer is unmatched. With no need to preheat the oven or spend hours waiting for a cake to cool, no-bake recipes can be a lifesaver for those with busy schedules or spontaneous entertaining plans. In just a short amount of time, you can whip up a delightful dessert that will impress your friends and family.
Moreover, no-bake desserts shine during the warmer months. As temperatures rise, the last thing anyone wants to do is turn on the oven and heat up the kitchen. No-bake recipes allow you to create delicious treats while keeping your space cool and comfortable. This makes them ideal for summer gatherings, barbecues, or even a simple evening on the patio.
Versatility is another significant advantage of no-bake desserts. From cheesecakes to parfaits, the possibilities are endless. This adaptability allows you to cater to various dietary preferences, whether you’re looking for gluten-free options, dairy-free alternatives, or even vegan treats. With a few simple ingredient swaps, you can elevate this No-Bake S’mores Cheesecake Jar to accommodate different tastes and needs, ensuring everyone can enjoy a taste of this delectable dessert.
Ingredients Breakdown for the Perfect S’mores Cheesecake Jars
To create your No-Bake S’mores Cheesecake Jars, it is essential to understand the role of each ingredient in achieving that classic s’mores flavor and creamy cheesecake texture.
The Crust
The foundation of any great cheesecake begins with a solid crust. In this recipe, graham cracker crumbs play a pivotal role in recreating the authentic s’mores experience. Their slightly sweet, buttery flavor and crumbly texture mimic the traditional graham crackers used in s’mores, providing that essential crunch.
To bind the crumbs together and create a cohesive base, granulated sugar is combined with melted butter. The sugar adds a touch of sweetness, while the melted butter helps to hold the mixture together, ensuring that each spoonful of cheesecake is balanced with the delightful crunch of the crust.
The Cheesecake Filling
The filling is where the magic happens. For a smooth and creamy texture, using softened cream cheese is crucial. Cold cream cheese can lead to a lumpy filling, so allowing it to soften to room temperature ensures that it blends seamlessly with the other ingredients.
Powdered sugar is then added to the cream cheese, providing sweetness while dissolving easily into the mixture. A splash of vanilla extract enhances the overall flavor, giving the cheesecake a rich and aromatic quality.
Finally, the addition of whipping cream elevates the filling to new heights. Whipping the cream until it forms soft peaks and folding it into the cream cheese mixture introduces air, resulting in a light and airy texture. This creaminess is essential for achieving that luscious mouthfeel synonymous with cheesecakes.
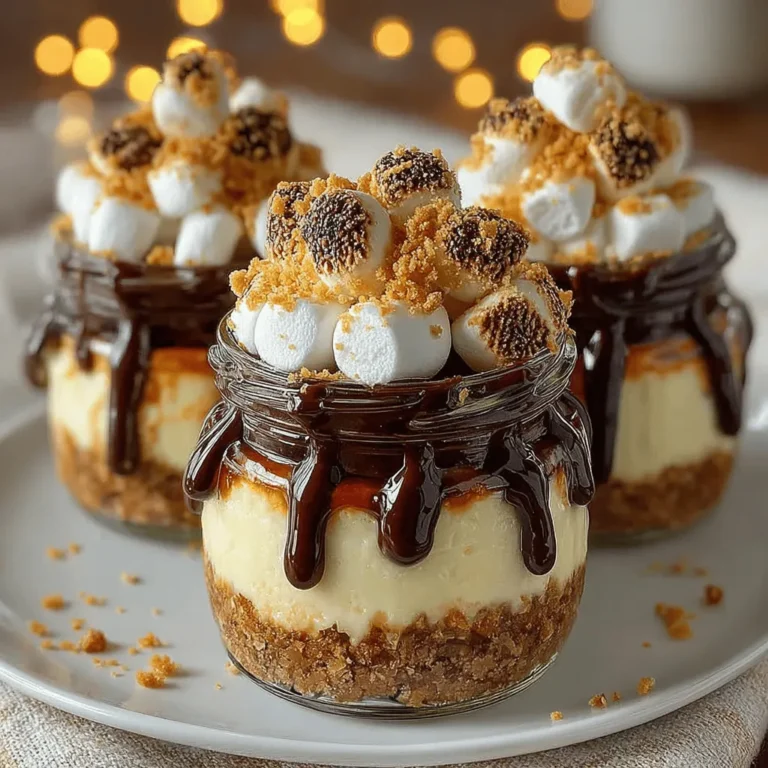
Toppings That Transform
No s’mores-inspired dessert would be complete without the iconic toppings. Mini marshmallows are a must-have for this recipe, bringing a nostalgic touch and a hint of sweetness that perfectly complements the other flavors. When toasted, these marshmallows can add a smoky depth reminiscent of traditional s’mores, making them an essential part of the experience.
To further enhance the dessert, melting chocolate chips and drizzling them over the top adds a rich and decadent layer of flavor. The warm, gooey chocolate contrasts beautifully with the cool cheesecake filling and crunchy crust, creating a delightful balance.
To finish it all off, a sprinkle of crushed graham crackers not only enhances the visual appeal of your jars but also adds another layer of texture. This final touch ties everything together, ensuring that each bite is a harmonious blend of flavors and textures.
Step-by-Step Instructions: Crafting Your No-Bake S’mores Cheesecake Jars
Now that you understand the components that make up the No-Bake S’mores Cheesecake Jars, it’s time to dive into the preparation. Here’s how to create your own individual jars of this scrumptious dessert.
Preparing the Crust
1. Gather Your Ingredients: You will need graham cracker crumbs, granulated sugar, and melted butter. If you prefer a more intense flavor, consider using honey-flavored graham crackers or adding a pinch of salt to the mixture.
2. Mix the Ingredients: In a medium-sized bowl, combine the graham cracker crumbs and granulated sugar. Pour in the melted butter and stir until the mixture resembles wet sand. Ensure that all the crumbs are coated; this will help the crust hold together once set.
3. Form the Crust: Take your serving jars or cups and evenly distribute the graham cracker mixture into the bottom of each. Use the back of a spoon or your fingers to press the mixture down firmly to create a solid base. This step is crucial for ensuring that the crust holds its shape when you dig in later.
Following these steps will set the stage for your No-Bake S’mores Cheesecake Jars. As you prepare the crust, the anticipation builds for the creamy filling and delightful toppings that will soon follow. Stay tuned for the next steps, where we will craft the cheesecake filling and assemble the jars to create a dessert experience that captures the essence of summer nights and campfire memories.
{{image_2}}
Mastering the Cheesecake Mixture
Creating a luscious No-Bake S’mores Cheesecake filling requires careful attention to the texture and consistency of the ingredients. Start by ensuring your cream cheese is at room temperature; this will make it easier to blend smoothly.
Combining Ingredients and Achieving the Right Consistency
1. Cream Cheese Preparation: In a large mixing bowl, add 16 ounces of softened cream cheese. Using an electric mixer, beat the cream cheese on medium speed until it becomes fluffy and smooth. This process is crucial as it eliminates any lumps, ensuring a creamy texture for the cheesecake.
2. Adding Sugar and Vanilla: Gradually add ½ cup of granulated sugar and 1 teaspoon of pure vanilla extract to the cream cheese. Beat the mixture again until everything is well combined and the sugar has dissolved. The vanilla not only enhances the flavor but also contributes to the overall aroma of the cheesecake.
3. Incorporating Whipped Cream: In a separate bowl, whip 1 cup of heavy cream until stiff peaks form. To achieve this, start by mixing on low speed and gradually increase to high. Be careful not to over-whip, as this can cause the cream to turn grainy. Once you have the stiff peaks, gently fold the whipped cream into the cream cheese mixture using a rubber spatula. This folding technique is essential for maintaining the lightness of the filling.
Tips for Pressing the Crust Firmly
To ensure your crust holds together and provides a solid base for the cheesecake, press the graham cracker mixture firmly into the bottom of each jar. Use the bottom of a measuring cup or a flat surface to compact the crust evenly. This step is critical because a well-pressed crust will not crumble when you layer the cheesecake filling on top.
Creating the Cheesecake Filling
With your crust prepared, the next step is to create the cheesecake filling.
Step-by-Step Guide on Beating Cream Cheese
1. In your large mixing bowl, beat the softened cream cheese until it’s creamy.
2. Gradually add the granulated sugar and vanilla extract.
3. Continue beating until the mixture is smooth and free of lumps.
Whipping Cream to Stiff Peaks
1. In a cold mixing bowl, pour in the heavy cream.
2. Beat on medium speed until bubbles begin to form, then increase to high speed.
3. Once you see soft peaks, continue mixing until stiff peaks form—this can take about 2-3 minutes.
Folding Techniques
1. Add one-third of the whipped cream to the cream cheese mixture and gently fold it in with a spatula.
2. Once incorporated, add the remaining whipped cream gradually, folding gently until there are no streaks. Be careful not to deflate the whipped cream to keep the filling light and airy.
Layering the Cheesecake
Now that you have your cheesecake filling ready, it’s time to layer it into the jars.
Techniques for Even Distribution
Using a piping bag or a spoon, distribute the cheesecake filling evenly over the crust in each jar. Aim for about two-thirds full to leave room for additional layers. After filling, use a spatula or the back of a spoon to smooth the tops for a polished appearance.
Toasting Mini Marshmallows
For that classic s’mores experience, consider adding mini marshmallows to your jars. You can choose to layer the marshmallows directly on top of the cheesecake filling or toast them first for enhanced flavor. To toast them, preheat your oven broiler, spread the marshmallows on a baking sheet, and broil for just a minute or two until they turn golden brown. Keep a close eye on them, as they can burn quickly!
Melting and Drizzling Chocolate
Chocolate is a key component of the s’mores experience, and adding it as a drizzle will elevate your cheesecake jars.
Safe Methods for Melting Chocolate
1. Microwave Method: Chop ½ cup of semi-sweet chocolate into small pieces. Place the chocolate in a microwave-safe bowl and microwave in 30-second intervals, stirring after each interval until melted and smooth. This should take about 1-2 minutes total, depending on your microwave’s power.
Achieving a Smooth Drizzle
Once the chocolate is melted, let it cool slightly before drizzling. You can use a spoon or a small squeeze bottle to create beautiful chocolate patterns over the toasted marshmallows. This not only enhances the flavor but also adds a visually appealing touch to your dessert.
Final Touches: Garnishing and Chilling
The final touches will help bring your No-Bake S’mores Cheesecake Jars to life.
Importance of Crushed Graham Crackers
Before serving, garnish each jar with a sprinkle of crushed graham crackers. This not only adds a delightful crunch but also visually ties in the s’mores theme.
Chilling Time
To allow the flavors to meld and the cheesecake to set, refrigerate the jars for at least 4-6 hours, or ideally overnight. This chilling time is essential for achieving the perfect texture and flavor profile. The longer you chill, the more the flavors develop, making each bite a delightful experience.
Serving Suggestions for the Ultimate Experience
When it comes to serving your No-Bake S’mores Cheesecake Jars, presentation plays a key role.
Ideas for Serving at Gatherings
These jars are perfect for parties, picnics, or family gatherings. Present them on a large platter for easy access or stack them in a cooler for outdoor events. They also make fantastic individual treats that guests can enjoy without the fuss of cutting cake.
Presentation Tips
To make your jars even more appealing, consider drizzling extra chocolate syrup over the top and adding a few additional marshmallows or chocolate chips as a finishing touch. A sprig of mint can also add a pop of color and freshness.
Nutritional Insights
While indulging in a dessert like No-Bake S’mores Cheesecake Jars, it’s essential to consider the nutritional aspects of your ingredients.
Overview of Nutritional Benefits
– Cream Cheese: A good source of calcium and protein, providing a creamy base that is both satisfying and indulgent.
– Heavy Cream: While higher in calories, it contributes to that rich texture that makes desserts delightful.
– Graham Crackers: Often made with whole grains, they provide fiber, which can be beneficial in moderation.
Portion Control
Despite being a rich dessert, moderation is key. Serving these jars in individual portions helps control intake, allowing everyone to enjoy a sweet treat without overindulgence.
Conclusion
Making No-Bake S’mores Cheesecake Jars is not just about creating a dessert; it’s about the joy of sharing a beloved classic in a new, exciting way. This recipe combines the flavors of campfire s’mores with the luxuriousness of cheesecake, making it a perfect treat for any occasion.
The ease of preparation, coupled with the satisfaction of creating something delicious, solidifies this dessert’s place in your repertoire. Don’t hesitate to experiment with variations—try adding flavored extracts, different toppings, or even swapping the graham cracker crust for another type of cookie.
Whether you’re serving them at a summer gathering or enjoying them alone, these cheesecake jars promise to deliver smiles and satisfaction in each delicious bite.
