
Cheesy Herb Bliss Scones: A Flavorful Twist on a Classic Delight
When it comes to baked goods, scones have carved out a special place in the hearts—and stomachs—of many. Originating from the British Isles, scones have long been cherished as a delightful accompaniment to tea, a satisfying breakfast option, or a tasty snack any time of day. Their versatility is one of their greatest appeals, allowing for endless variations that cater to both sweet and savory palates. Among these variations, savory scones have gained traction in recent years, with one standout recipe stealing the spotlight: Cheesy Herb Bliss Scones. These scones beautifully marry the richness of cheese with the fresh, vibrant notes of herbs, making them an ideal choice for any occasion—from a cozy brunch with friends to an elegant tea party fit for guests.
As the trend for savory scones continues to rise, Cheesy Herb Bliss Scones exemplify how delightful and satisfying a non-sweet scone can be. The balance of gooey cheese, aromatic herbs, and the flaky texture of a well-made scone creates a satisfying bite that is both comforting and indulgent. For those looking to elevate their baking repertoire, this recipe not only offers a delicious treat but also invites creativity in the kitchen, allowing you to experiment with different cheese and herb combinations.
Understanding Scones: A Brief Overview
Scones have a rich history that dates back to the 16th century, initially thought to have originated in Scotland. Traditionally, they are made using a simple mixture of flour, sugar, baking powder, butter, and milk or cream. Over time, the scone has evolved, with variations emerging across different cultures. In the United Kingdom, scones are typically associated with afternoon tea, served alongside clotted cream and jam. Meanwhile, in the United States, they have morphed into a beloved café item, often featuring sweeter flavors like blueberries or chocolate chips.
While sweet scones are undoubtedly delightful, savory scones present an exciting alternative. They can serve as a side dish to soups and salads or stand alone as a snack. The beauty of savory scones lies in their adaptability; ingredients can be tailored to fit any meal or occasion. Cheesy Herb Bliss Scones embody this adaptability, proving that scones can be both flavorful and satisfying without the need for sugar or fruit.
Key Ingredients That Make Cheesy Herb Bliss Scones Irresistible
To craft the perfect Cheesy Herb Bliss Scones, it’s essential to understand the role of each ingredient. Each component contributes to the unique flavor, texture, and overall success of the scones.
– The Role of All-Purpose Flour: All-purpose flour is the cornerstone of scone-making. It provides the necessary structure while allowing for a light, tender crumb. When combined with the right ratios of fat and liquid, it helps achieve that appealing flaky texture that scone lovers crave. Choosing the right flour is crucial; too much flour can lead to dense scones, while too little may result in a weak structure.
– The Importance of Baking Powder and Baking Soda: These leavening agents are vital for creating the lightness that distinguishes a good scone from a great one. Baking powder provides an initial lift, while baking soda acts as a secondary leavening agent, especially when combined with acidic ingredients like buttermilk. Together, they ensure that the scones rise beautifully in the oven.
– The Magic of Cold Butter: Cold butter is a game changer in scone-making. When it is cut into the flour mixture, it creates small pockets of fat that, once baked, expand and create a flaky texture. The colder the butter, the better the results, which is why many bakers recommend chilling it before use. This technique is fundamental to achieving that coveted scone texture.
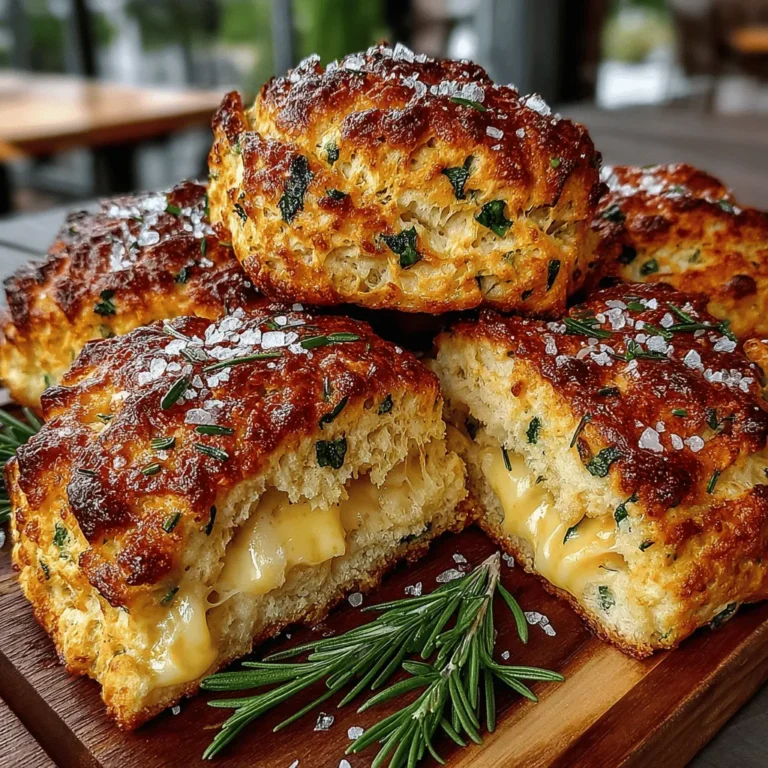
– Cheese Choices: The type of cheese used in Cheesy Herb Bliss Scones can significantly impact the final flavor. Sharp cheddar provides a robust flavor that pairs beautifully with fresh herbs, while Gruyère adds a nutty richness. You can experiment with other cheeses, such as feta or goat cheese, to introduce different flavor profiles. Each cheese brings its unique characteristics, allowing for personalization based on preferences.
– Fresh Herbs: Fresh herbs are the soul of these scones. They infuse the dough with vibrant flavors and aromas that elevate the entire experience. Common choices include chives, parsley, and thyme, but feel free to get creative with your favorites. Dried herbs can be used in a pinch, but fresh herbs will yield a more pronounced flavor and brighter color.
– Buttermilk vs. Milk with Vinegar: Buttermilk is often preferred in scone recipes due to its acidity, which tenderizes the gluten and contributes to a moist crumb. If buttermilk isn’t on hand, you can easily create a substitute by mixing milk with a tablespoon of vinegar or lemon juice—simply let it sit for a few minutes until it curdles. This simple trick allows you to achieve the same tender texture without sacrificing flavor.
Step-by-Step Guide to Crafting Cheesy Herb Bliss Scones
Now that you understand the essential ingredients, it’s time to delve into the process of making these delightful scones. Here’s a detailed breakdown of the initial steps to ensure your baking adventure starts on the right foot.
– Preheating the Oven: Before you begin mixing your ingredients, preheat your oven to 400°F (200°C). This step is crucial, as it ensures that your scones will bake evenly and achieve that perfect golden-brown color. An adequately preheated oven allows the leavening agents to work their magic, helping your scones rise beautifully.
– Mixing Dry Ingredients: In a large mixing bowl, combine your all-purpose flour, baking powder, baking soda, and salt. Using a whisk, mix these dry ingredients thoroughly to ensure that the leavening agents are evenly distributed throughout the flour. This step is essential for achieving a uniform rise and texture in your scones. If you notice any lumps, it may be beneficial to sift the flour before mixing. This will help create a lump-free, airy mixture, setting the foundation for your scones.
As you embark on the journey to create Cheesy Herb Bliss Scones, remember that baking is both a science and an art. Understanding the purpose of each ingredient and following the steps carefully will lead you to a batch of scones that are not only delicious but also a joy to share.
{{image_2}}
Cutting in the Butter
Achieving the right crumb texture in scones is paramount to their success. The technique called “cutting in the butter” is essential for creating that light, flaky texture that makes scones irresistible. To cut in the butter effectively, start with cold, unsalted butter. Using a pastry cutter or two forks, work the butter into the flour mixture until it resembles coarse crumbs. Aim for pea-sized pieces; this ensures that when the scones bake, the butter will melt and create steam pockets, resulting in a beautifully airy scone.
Alternatively, if you have a food processor, you can pulse the butter into the flour. Just be cautious not to over-process, as you want to maintain some larger chunks for optimal texture. After cutting in the butter, you should have a mixture that is slightly crumbly but holds together when squeezed.
Incorporating Cheese and Herbs
To achieve a delightful burst of flavor in your scones, it’s crucial to incorporate cheese and herbs evenly throughout the dough. Begin by grating or cubing your cheese, ensuring it is well-distributed. For the herbs, whether you are using fresh or dried, chop them finely. This step is essential for ensuring that every bite of the scone is infused with the flavors of your chosen herbs, which may include chives, rosemary, or thyme.
When adding these ingredients, do so after the butter is cut in but before you add the wet ingredients. Gently fold the cheese and herbs into the flour mixture using a spatula or your hands. Be careful not to overmix, as this can develop the gluten in the flour, leading to denser scones. The goal is to have a homogeneous mixture where cheese and herbs are scattered evenly, enhancing the flavor profile without compromising the delicate texture.
Combining Wet Ingredients
The next step is to combine your wet ingredients, typically consisting of milk or cream and an egg. It is essential to mix these ingredients just enough to combine but not so much that you develop gluten, which would make your scones tough. A gentle folding technique is recommended here. Pour the wet mixture into the dry ingredients and use a spatula to bring them together.
As you mix, be attentive to the consistency of the dough. If it appears too dry, add a splash more milk; if it is too wet, sprinkle in a little more flour. The dough should be slightly sticky but manageable. Remember, the less you handle the dough, the more tender your scones will be, so keep mixing to a minimum.
Shaping the Dough
Once your dough is combined, it’s time to shape the scones. Turn the dough out onto a lightly floured surface. Gently pat the dough into a circle about 1-inch thick. This thickness is crucial for ensuring even baking. Using a sharp knife or a round cutter, cut the dough into triangles or circles, depending on your preference.
For best results, avoid twisting the cutter when cutting; instead, press straight down to help maintain the scone’s rise. Once shaped, you can transfer the scones to a baking sheet lined with parchment paper, ensuring they are spaced about 1-2 inches apart. This spacing is significant, as it allows the heat to circulate evenly, leading to perfectly baked scones.
Preparing for Baking
Before you place your scones in the oven, applying an egg wash can enhance their appearance, giving them a beautiful golden-brown color. To prepare an egg wash, beat one egg with a tablespoon of milk or cream and brush the mixture over the tops of the scones using a pastry brush. This step not only improves their visual appeal but also adds an additional layer of richness.
Ensure your oven is preheated to the correct temperature, typically around 400°F (200°C) for scones. This high heat is essential for creating a nice rise and crisp exterior. As you bake, keep an eye on the spacing of the scones; they should not be too close together, as this can hinder their rise and result in uneven baking.
Baking Perfectly
Now it’s time to bake your Cheesy Herb Bliss Scones. The baking time usually ranges from 15 to 20 minutes, depending on your oven. To know when they are done, look for a few indicators: the scones should be golden brown on the top, and when you gently tap the bottom, it should sound hollow. Additionally, you can insert a toothpick or skewer into the center; it should come out clean with no wet dough clinging to it.
Once baked to perfection, remove the scones from the oven and let them cool on a wire rack for a few minutes. This cooling period allows the steam to escape, preventing them from becoming soggy.
Cooling and Serving
To enjoy your Cheesy Herb Bliss Scones at their freshest, serve them warm. If you let them cool completely, they can still be delicious, but the texture is best right out of the oven. You can slice them open and spread a bit of butter, cream cheese, or even a flavored cheese spread to elevate the experience.
For an added touch, consider pairing your scones with a light salad or a bowl of soup. Their cheesy flavor complements many dishes, making them a versatile addition to your dining table.
Serving Suggestions for Cheesy Herb Bliss Scones
These scones can be enjoyed in several delightful ways. Serve them warm with a generous pat of butter or a dollop of cream cheese for a simple yet satisfying treat. They pair beautifully with soups, particularly creamy tomato or hearty vegetable soups, providing a perfect contrast in textures.
For more adventurous pairings, consider creating a cheese platter that includes your scones alongside a selection of cured meats, olives, and pickles. This arrangement not only showcases the scones but also creates an elegant presentation for entertaining guests.
Another creative serving idea is to whip up an herb-infused butter. Simply mix softened butter with your choice of finely chopped fresh herbs and a pinch of salt. Spread this herb butter on your scones for an extra layer of flavor that enhances the cheesy notes.
Nutritional Benefits of Cheesy Herb Bliss Scones
Understanding the nutritional benefits of the ingredients in Cheesy Herb Bliss Scones can enhance your appreciation for this delightful treat.
The Role of Cheese
Cheese is a primary ingredient in these scones, contributing both flavor and nutritional value. It is a great source of protein, which is essential for muscle repair and growth. Additionally, cheese is rich in calcium, promoting strong bones and teeth. Depending on the type of cheese used, you can also gain various vitamins and minerals that contribute to overall health.
The Benefits of Fresh Herbs
Fresh herbs not only enhance the flavor of your scones but also provide numerous health benefits. Herbs like chives, rosemary, and thyme are packed with antioxidants, vitamins, and minerals. They can aid digestion, boost the immune system, and even have anti-inflammatory properties. Incorporating these herbs into your scones adds a nutritious element that complements the richness of the cheese.
Whole Ingredients
Using whole ingredients in your scone recipe is an advantage over processed alternatives. Whole ingredients tend to retain more nutrients, offering better flavor and health benefits. For example, whole grain flours provide additional fiber, which is beneficial for digestive health and can help maintain a feeling of fullness. Choosing high-quality, unprocessed ingredients ensures that your scones are not only delicious but also nourishing.
Conclusion
Cheesy Herb Bliss Scones are a delightful addition to both casual and formal dining experiences. Their flaky texture and rich flavor make them a satisfying treat that can be enjoyed at any time of day. Whether you serve them warm with butter, alongside a comforting soup, or as part of a sophisticated cheese platter, these scones are sure to impress.
Embrace the opportunity to create these scones in your kitchen, allowing your creativity to shine through as you experiment with different cheeses and herbs. The joy of baking is not just in the end product but also in the process of crafting something delicious from scratch. So gather your ingredients, preheat that oven, and get ready to enjoy the blissful experience of homemade Cheesy Herb Bliss Scones.
