
As summer approaches, the quest for the perfect dessert becomes a delightful endeavor. Cherry Bliss Chill Bars stand out as an ideal choice for warm weather gatherings, offering a refreshing and indulgent treat that is sure to impress family and friends alike. These no-bake bars are not only easy to prepare but also deliver a harmonious blend of creamy sweetness and tart cherry flavor that makes them irresistible. With minimal effort, you can create a dessert that captures the essence of summer in every bite.
No-bake desserts have gained immense popularity, particularly during the hotter months when turning on the oven can feel like a daunting task. Cherry Bliss Chill Bars exemplify the convenience and simplicity that no-bake recipes offer, allowing you to spend more time enjoying the sunshine and less time in the kitchen. With layers of graham cracker crust, rich cream cheese filling, airy whipped topping, and luscious cherry pie filling, these bars promise a delightful experience for the taste buds. Each component contributes to a balanced flavor profile that perfectly combines creamy, sweet, and tart notes.
Understanding the Ingredients
Graham Cracker Crust
The foundation of Cherry Bliss Chill Bars begins with a graham cracker crust—a classic choice for many desserts. Made from finely crushed graham crackers, this crust provides a subtle sweetness and a slightly nutty flavor that perfectly complements the rich filling. The texture of the crushed graham crackers creates a sturdy base that holds the layers of the dessert together, ensuring each bite is satisfying.
Butter plays a pivotal role in binding the crust, giving it a rich flavor while also contributing to its crumbly texture. When mixed with the graham cracker crumbs and a touch of sugar, melted butter creates a mixture that can be easily pressed into a baking dish. Achieving the right consistency is crucial; the crust should hold together well without being overly dry or too wet. A well-prepared graham cracker crust not only serves as a stable base but also adds a delightful crunch to the overall dessert experience.
Cream Cheese Layer
Next comes the cream cheese layer, where the magic truly begins. Cream cheese is the star of this layer, providing a rich and creamy texture that contrasts beautifully with the crispness of the crust. Its tangy flavor enhances the overall sweetness of the dessert, creating a balanced profile that keeps your taste buds intrigued.
To elevate the flavor of the cream cheese layer, powdered sugar is mixed in to add sweetness without the graininess that granulated sugar might introduce. Additionally, a splash of vanilla extract reinforces the dessert’s overall flavor, imparting an aromatic quality that enhances the indulgence. This creamy filling is what makes Cherry Bliss Chill Bars so decadent, inviting you to savor every bite.
Whipped Topping
The next essential component is the whipped topping, which is responsible for adding a lightness and airiness to the dessert. This layer elevates the Cherry Bliss Chill Bars from merely good to truly exceptional. The fluffy texture of the whipped topping contrasts beautifully with the dense cream cheese layer, making each bite feel indulgent yet refreshing.
When it comes to whipped topping, you have the option of using store-bought or making your own. Homemade whipped topping can be a delightful addition, offering a freshness and flavor that is often unparalleled. However, store-bought whipped topping provides convenience and consistency, making it a practical choice for those short on time. Whichever option you choose, the whipped topping will play a key role in creating the perfect texture for your Cherry Bliss Chill Bars.
Cherry Pie Filling
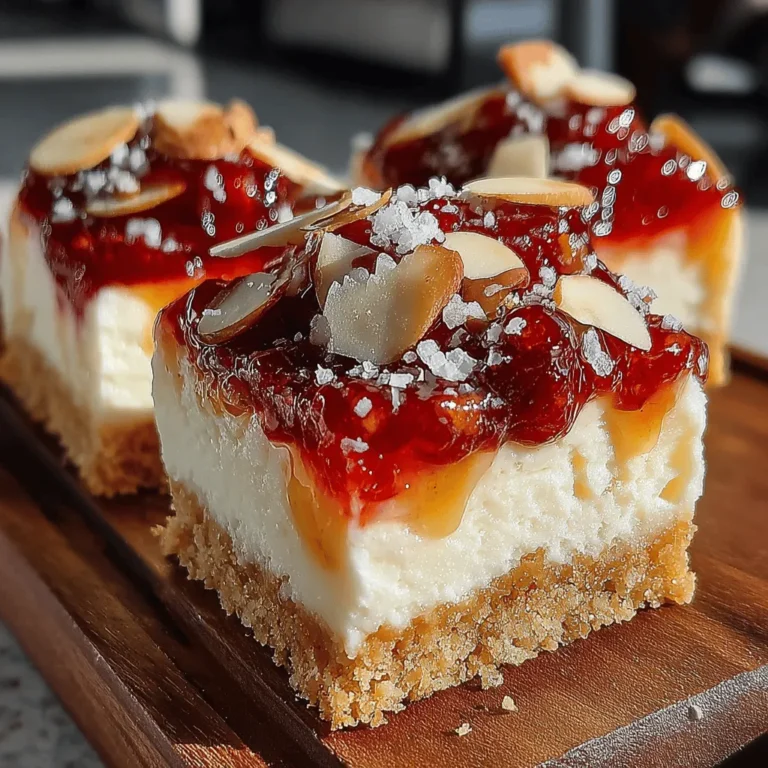
No dessert featuring cherries would be complete without cherry pie filling, which serves as the crowning glory of these chill bars. The sweet and tart flavor of the cherry pie filling adds a vibrant burst of color and taste that complements the creamy layers beneath. Not only does it provide a delicious topping, but it also enhances the visual appeal of the dessert, making it an eye-catching centerpiece for any gathering.
For those who prefer a fresher option, using homemade or fresh cherry topping is a fantastic alternative. Fresh cherries can be cooked down with sugar and a bit of cornstarch to create a delicious topping that rivals its canned counterpart. This option not only allows for customization of flavor but also elevates the overall quality of the dessert. Whether you opt for traditional cherry pie filling or a fresh alternative, this layer is essential for achieving that classic cherry flavor.
Optional Garnish
To take your Cherry Bliss Chill Bars to the next level, consider adding a sprinkle of slivered almonds as an optional garnish. This simple addition provides a delightful crunch and visual appeal, enhancing the overall texture of the dessert. The nutty flavor of the slivered almonds complements the sweetness of the cherry filling and the creaminess of the layers, creating a well-rounded dessert that will delight your guests.
Step-by-Step Instructions for Cherry Bliss Chill Bars
Preparing the Crust
Now that you understand the importance of each ingredient, let’s dive into the first step of preparing the Cherry Bliss Chill Bars: creating the graham cracker crust. Start by gathering your ingredients, which include graham cracker crumbs, melted butter, and a bit of sugar.
1. Mixing the Ingredients: In a mixing bowl, combine 1 and ½ cups of graham cracker crumbs with ⅓ cup of granulated sugar. Mixing these two dry ingredients together will ensure that the sugar is evenly distributed throughout the crust.
2. Adding the Butter: Next, add ½ cup of melted butter to the graham cracker and sugar mixture. The melted butter is crucial for binding the crust together, so make sure it’s fully incorporated.
3. Achieving the Right Consistency: Use a fork or your hands to mix the ingredients until the mixture resembles wet sand. It should hold together when squeezed but not be overly sticky. If the mixture is too dry, you can add a little more melted butter, one tablespoon at a time, until you reach the desired consistency.
4. Pressing into the Pan: Once the crust mixture is ready, transfer it to a 9×13-inch baking dish. Use the back of a measuring cup or your fingers to press the mixture firmly and evenly into the bottom of the dish. This step is crucial for ensuring that the crust holds together when the bars are cut.
5. Chilling the Crust: After pressing the crust into the pan, place it in the refrigerator for about 30 minutes to set. This chilling time allows the butter to harden, solidifying the crust and making it easier to layer the cream cheese filling on top.
With the crust prepared and chilling, you are well on your way to creating the delightful Cherry Bliss Chill Bars. The next steps will involve crafting the cream cheese layer and assembling the bars to create a dessert that is not only visually appealing but also a delightful treat for any occasion. Stay tuned for the continuation of this delicious recipe.
{{image_2}}
Pressing the Base
To create the perfect foundation for your Cherry Bliss Chill Bars, it’s essential to press the crust evenly into your baking dish. Start by preheating your oven to 350°F (175°C) to ensure the crust bakes evenly.
1. Prepare the Baking Dish: Lightly grease a 9×13-inch baking dish with cooking spray or line it with parchment paper, leaving some overhang for easy removal later.
2. Combine the Crust Ingredients: In a bowl, mix together graham cracker crumbs, melted butter, and sugar until well combined. The mixture should resemble wet sand.
3. Pressing Technique: Pour the crumb mixture into the prepared baking dish. Using the back of a measuring cup or your fingers, press the crumbs firmly and evenly across the bottom of the dish. This step is crucial to prevent the crust from crumbling when you cut the bars. Aim for a thickness of about 1/4 inch.
4. Bake the Crust: Place the baking dish in the preheated oven and bake for 8-10 minutes, or until the crust is lightly golden and set. Allow it to cool completely before adding the cream cheese layer.
Making the Cream Cheese Layer
The cream cheese layer is what makes these bars rich and indulgent. Here’s how to achieve a smooth and creamy filling:
1. Prepare the Cream Cheese: Ensure your cream cheese is at room temperature for easier mixing. This will help you avoid lumps in your mixture.
2. Mixing Instructions: In a large mixing bowl, use an electric mixer to beat the cream cheese until it’s smooth and creamy, about 1-2 minutes on medium speed.
3. Add Sugar and Vanilla: Gradually add the powdered sugar, mixing on low speed to prevent sugar clouds from forming. After incorporating the sugar, add the vanilla extract. Continue mixing until the ingredients are fully combined and the mixture is smooth.
4. Taste Test: At this stage, it’s a good idea to taste the cream cheese mixture. If you prefer it sweeter, feel free to add more powdered sugar to suit your palate.
Folding in the Whipped Topping
Folding in the whipped topping gives the cream cheese layer that light and airy texture, which is essential for these bars. Follow these steps carefully to maintain volume:
1. Prepare the Whipped Topping: Make sure your whipped topping is thawed if using frozen.
2. Folding Technique: Using a spatula, gently scoop a third of the whipped topping into the cream cheese mixture. Use a folding motion—starting from the bottom of the bowl and bringing the mixture over the top. This technique helps to incorporate air without deflating the whipped topping.
3. Continue Folding: Repeat this process with the remaining whipped topping until fully combined. Be careful not to overmix, as this can cause the mixture to lose its fluffiness.
Assembling the Bars
Now it’s time to bring everything together!
1. Spread the Cream Cheese Mixture: Once the crust has cooled, pour the cream cheese mixture over the crust. Use a spatula to spread it evenly, ensuring it reaches all corners of the baking dish.
2. Smooth the Top: After spreading, gently tap the baking dish on the counter to remove any air bubbles and ensure an even layer.
Adding the Cherry Topping
The cherry topping not only adds flavor but also enhances the visual appeal of your bars. Here’s how to layer or swirl it:
1. Prepare the Cherry Filling: If you’re using canned cherry pie filling, give it a good stir to ensure it’s well mixed. For a fresh twist, consider using fresh or frozen cherries cooked down with a bit of sugar and cornstarch until thickened.
2. Layering Technique: Spoon the cherry filling over the cream cheese layer. You can choose to spread it evenly or dollop it in sections for a more rustic look.
3. Swirling for Presentation: For a beautiful swirl effect, use a knife or skewer to gently swirl the cherry filling into the cream cheese layer. Be careful not to mix them completely; you want to create a marbled effect.
Chilling the Bars
Chilling is an essential step in solidifying the layers and enhancing the flavor:
1. Cover and Chill: Once assembled, cover the baking dish with plastic wrap or aluminum foil. Place it in the refrigerator for at least 4 hours, or ideally overnight. This allows the layers to set properly and the flavors to meld.
2. Importance of Chilling: Chilling not only firms up the cream cheese layer but also brings out the flavors of the cherries, making each bite a delightful experience.
Serving Suggestions
When it’s time to serve your Cherry Bliss Chill Bars, consider these tips:
1. Cutting the Bars: Use a sharp knife to cut the bars into squares or rectangles. For clean edges, dip the knife in warm water and wipe it clean between cuts.
2. Garnishing: For an extra touch, consider garnishing the bars with slivered almonds, fresh mint, or a drizzle of chocolate sauce for added flavor and presentation.
3. Serving Temperature: These bars can be served straight from the fridge, but letting them sit at room temperature for about 10-15 minutes can enhance the creaminess of the filling.
Nutritional Information
Understanding the nutritional aspects of your Cherry Bliss Chill Bars can help you enjoy them guilt-free:
1. Nutritional Overview: Each bar offers a delightful balance of carbohydrates, fats, and proteins. The cream cheese provides protein and calcium, while the cherries add vitamins and antioxidants.
2. Portion Control: With a recipe yielding approximately 12-16 bars, you can easily practice portion control by enjoying one or two bars at a time, making them a satisfying treat without overindulging.
3. Balanced Diet: These bars can fit into a balanced diet when enjoyed occasionally. Pair them with fresh fruits or a protein-rich snack to maintain nutritional balance.
Creative Variations and Substitutions
Feel free to experiment with flavors and ingredients to make these bars your own:
1. Flavor Variations: Instead of cherry pie filling, try using other fruit pie fillings like blueberry, raspberry, or even peach for a different twist. Each fruit brings its unique flavor profile that can transform the dessert.
2. Dietary Restrictions: For a gluten-free version, substitute the graham cracker crust with crushed gluten-free cookies or almond meal. If you need a dairy-free option, look for vegan cream cheese and whipped topping alternatives.
3. Add-ins and Toppings: Consider adding a layer of crushed nuts, coconut flakes, or chocolate chips into the cream cheese mixture before spreading it over the crust for added texture and flavor.
Conclusion
Cherry Bliss Chill Bars are not just a dessert; they are a delightful experience that combines creamy, fruity, and crunchy layers into a refreshing treat. Perfect for gatherings, picnics, or simply a sweet indulgence at home, these bars are sure to impress family and friends alike.
By trying this recipe, you’ll not only enjoy a delicious dessert but also savor the joy of creating something special. Homemade desserts have a charm that store-bought treats can’t replicate, and sharing them with your loved ones makes the experience even sweeter. So gather your ingredients, follow the steps, and treat yourself to the bliss of Cherry Bliss Chill Bars!
